Table of Contents
Halloween is just around the corner, and what better way to get your little ones involved than with some super fun, not-so-scary crafts? If you've got a 2, 3, or 4-year-old running around, you know that keeping them entertained can be a bit of a challenge. That's why I've put together this list of 40 irresistibly easy halloween crafts for 2-4 year olds. We're talking about simple, engaging activities that even the tiniest hands can manage (with a little help from you, of course!). Forget about complicated projects that end in frustration. Instead, think paint, glue, and lots of giggles. From spooky ghosts to silly pumpkins, these crafts are designed to spark creativity and make some adorable memories. This article is structured to guide you through age-appropriate crafts, beginning with simpler projects perfect for 2-year-olds, moving on to slightly more complex ideas for 3-year-olds, and finally, some crafts that 4-year-olds will really enjoy. Plus, we'll throw in some helpful tips to make your crafting session a success. So, grab your art supplies and let's get started!
Spooky Fun: Halloween Crafts for 2YearOlds
Spooky Fun: Halloween Crafts for 2YearOlds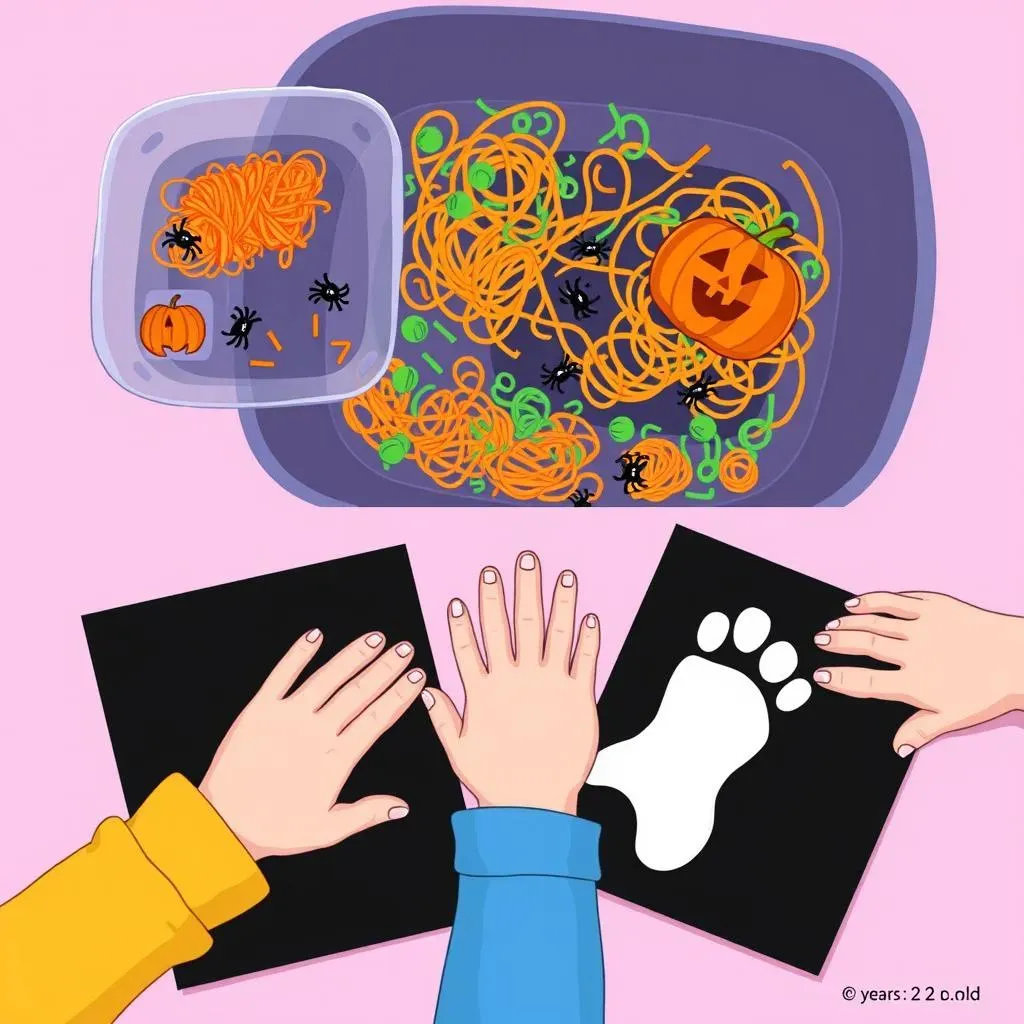
Spooky Sensory Spaghetti
Okay, let's be real, two-year-olds are basically tiny, adorable chaos machines. But that's part of their charm, right? So, instead of fighting it, let’s channel that energy into something fun! For our first craft, we're making a Halloween sensory bin using cooked spaghetti. Yes, you heard me right, spaghetti! Cook some up, let it cool, and then mix in some food coloring. We went for orange and green, because, well, Halloween. Toss it into a bin, add some plastic spiders or googly eyes, and let your toddler go wild. It's messy, it's fun, and it’s totally safe for them to explore with their hands.
I remember when my little one first tried this, she was so confused, but then she started laughing and just went for it. It was a total hit! This isn’t just about having fun, it's also great for their sensory development. They’re exploring different textures and getting used to new things. Plus, it’s super easy to clean up, just chuck the spaghetti in the bin.
Pumpkin Apple Prints
Next up, we're diving into the world of edible art. Who says you can't play with your food? For this one, we're creating pumpkin prints using apples. Cut an apple in half, and then you can carve a simple pumpkin face into the flat side. Don’t worry about making it perfect; remember, it’s for a two-year-old. Then, dip the apple into some orange paint and stamp it onto paper. It's a simple way to introduce them to shapes and colors.
The best part is that if they try to take a nibble, they can. Though, I don’t recommend it, paint doesn't taste good. This is a great project because it's easy to set up, easy to execute, and it’s not going to create a huge mess. Remember, with toddlers less is more. You can always add more colors, like green for the stem. Let them be creative.
Craft | Materials | Benefits |
|---|---|---|
Spooky Sensory Spaghetti | Cooked spaghetti, food coloring, plastic spiders/googly eyes | Sensory exploration, fine motor skills |
Pumpkin Apple Prints | Apples, orange paint, paper | Shape recognition, color identification, edible fun |
Ghostly Footprints
Okay, now, for this last one, prepare for some serious cuteness. We're making ghostly footprints! Cover your toddler’s foot in white paint, and then press it onto a piece of dark-colored paper. Once it's dry, you can add little googly eyes to make them look like adorable ghosts. It’s a great way to capture a moment in time and create a sweet keepsake. It also doubles as a great gift for grandparents.
I know it sounds a little wild, but trust me, it’s totally worth it. Just have some wipes handy because things might get a little messy. This is all about making memories with your little one. It's not about perfection, it's about having fun and creating something together that you can look back on. Plus, who doesn’t love a footprint ghost? They’re just so cute!
Creative Corner: Halloween Crafts for 3YearOlds
Creative Corner: Halloween Crafts for 3YearOlds
Alright, so we've tackled the toddler territory, and now it's time to amp things up a notch for our 3-year-old crowd. These little guys are starting to get a bit more coordinated, and their imaginations are really taking off, which means we can introduce slightly more complex crafts. We're still keeping it simple, but adding a few more steps and a little more room for creativity. Think less "smash and grab" and more "careful placement and giggles."
For this section, we are going to make mummy pumpkins, painted pumpkins, and beaded pumpkin pipe cleaners. These crafts are designed to be fun and engaging, while also helping develop their fine motor skills and creativity. I remember when my nephew, who was three at the time, made his first mummy pumpkin, he was so proud of it, he carried it around for days. It’s moments like these that make crafting with kids so rewarding.
Mummy Pumpkins
First off, let’s get spooky with mummy pumpkins! This one is super simple but incredibly fun. You’ll need some small pumpkins, white crepe paper or gauze, and some googly eyes. Have your 3-year-old wrap the crepe paper or gauze around the pumpkin, making sure to leave some gaps for the eyes to peek through. It doesn't need to be perfect; in fact, the messier, the better. Once they’re done wrapping, glue on a couple of googly eyes, and boom, you’ve got an adorable little mummy pumpkin. It’s a great way for them to practice their fine motor skills while creating something festive.
I remember when my niece did this, she was so meticulous about making sure her mummy was "just right," it was adorable to watch her concentration. It’s a great craft to let them explore their creativity, and the end result is something they can display with pride. Plus, it’s not messy, which is a win in my book.
Painted Pumpkins
Next, let's unleash our inner artists with painted pumpkins. Now, I know what you might be thinking, paint and three-year-olds, that sounds like a recipe for disaster, but trust me, it’s manageable. Forget about perfectly carved jack-o-lanterns. We're going for abstract art here. Give your little ones some small pumpkins and a variety of non-toxic paints. Let them go wild. They can use brushes, fingers, sponges, whatever their little hearts desire. It's all about experimenting with colors and textures.
This activity not only encourages creativity but also helps them learn about color mixing and different art techniques. It’s like a mini art class right in your living room. The best part, every pumpkin will be unique and totally made by them. My son, when he was three, painted a pumpkin that looked like a rainbow explosion. It’s still one of my favorite Halloween decorations.
Craft | Materials | Benefits |
|---|---|---|
Mummy Pumpkins | Small pumpkins, white crepe paper/gauze, googly eyes, glue | Fine motor skills, creativity, festive fun |
Painted Pumpkins | Small pumpkins, non-toxic paints, brushes/sponges | Color mixing, artistic expression, sensory exploration |
Beaded Pumpkin Pipe Cleaners
Finally, for a bit of fine motor skill work, let's create some beaded pumpkin pipe cleaners. This one is great for hand-eye coordination and concentration. You'll need some orange pipe cleaners, green pipe cleaners, and orange or yellow beads. Bend the orange pipe cleaner into a pumpkin shape, and then have your child thread the beads onto the pipe cleaner. Once they’ve filled it with beads, you can use a green pipe cleaner to make a stem. This craft is not only fun, but it also helps them to develop their pincer grasp, which is crucial for writing.
I recall making these with a group of kids, and it was amazing to see how focused they were. It's a great craft to get them concentrating. This activity is a simple, fun way to get them ready for school. It’s all about learning through play, and these beaded pumpkins are a perfect example of that.
Crafty Delights: Halloween Crafts for 4YearOlds
Crafty Delights: Halloween Crafts for 4YearOlds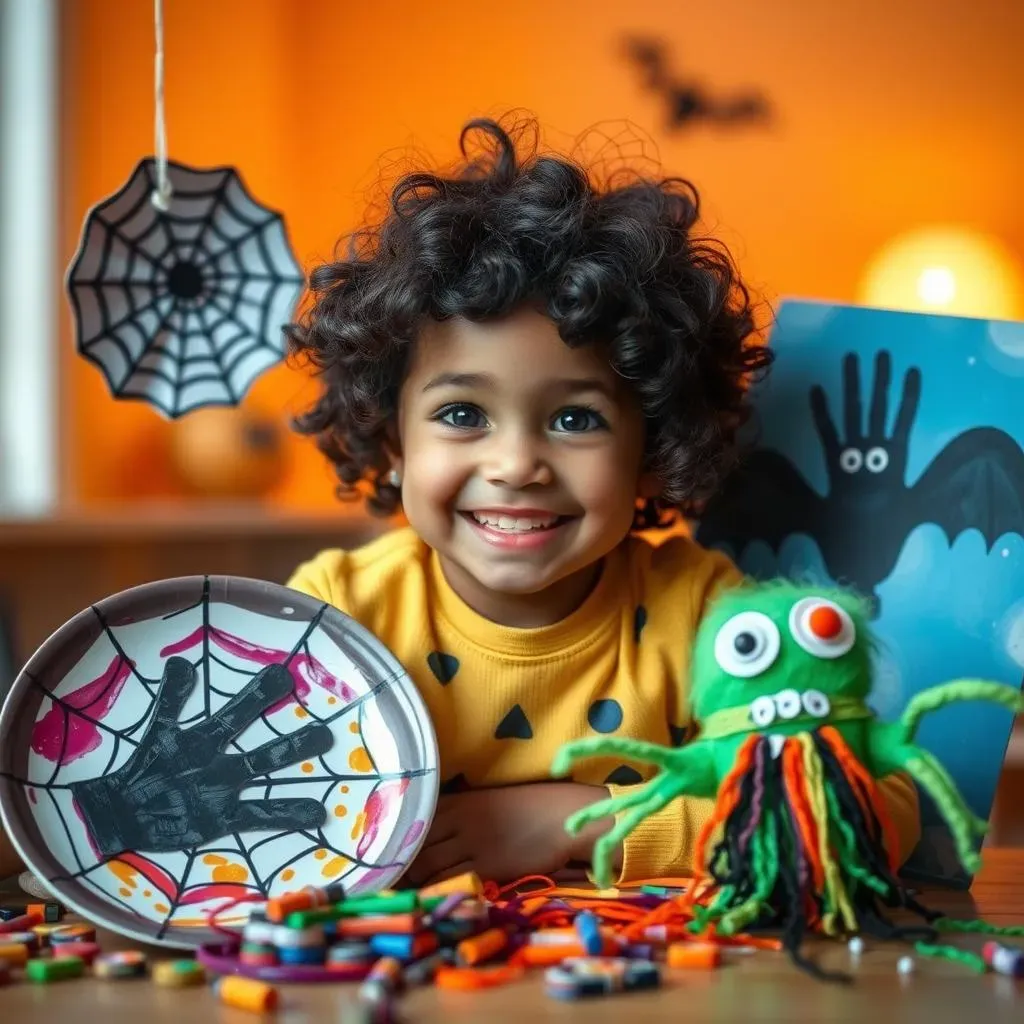
Spider Web Plates
Alright, so we've got the toddlers and the slightly-older toddlers covered, now let’s talk about the 4-year-olds. These kids are practically crafting pros at this point, right? They've got the fine motor skills, the creativity, and the attention span (well, sometimes!). So, we need to step up our game a little bit. First up, we're making spider web plates. This is a great project that mixes a bit of art with a dash of science. You'll need some paper plates, black paint, and some white yarn or string. Start by having your little one paint the paper plate black. Once it's dry, punch some holes around the edge, and then let them weave the white yarn through the holes to create a spider web design.
It's a great activity to develop their hand-eye coordination, plus they get to create their own spooky spider web. I remember my daughter doing this, and she was so proud of her “real” spider web, she hung it up in her room for weeks. This is a fun and creative way to get them thinking about different patterns and designs. It's also a great way to use up some of that yarn you have lying around!
Bat Handprints
Next, we are making bat handprints. This is a classic craft that’s always a hit. All you need is black paint, white paper, and some googly eyes. Have your child paint their hand black, and then press it onto the white paper, fingers spread out to create the bat wings. Once it’s dry, you can add some googly eyes to make your little bat come to life. It’s a simple and fun project that allows them to get messy and creative.
The best part is that it's also a wonderful keepsake. I have a whole collection of these from my kids, and it's amazing to see how their handprints have grown over the years. Plus, it’s a great way to teach them about animals and how they can be depicted in art. This is another great project that’s easy to set up, easy to execute, and doesn’t make a huge mess, which is always a plus in my book.
Craft | Materials | Benefits |
|---|---|---|
Spider Web Plates | Paper plates, black paint, white yarn/string | Hand-eye coordination, pattern recognition, creativity |
Bat Handprints | Black paint, white paper, googly eyes | Fine motor skills, animal recognition, keepsake |
Monster Puppets
Lastly, let’s create some monster puppets. This craft is all about imagination and storytelling. You’ll need some paper bags, colored construction paper, glue, scissors, and googly eyes. Let your child design their own monster using the construction paper. They can cut out different shapes for the eyes, mouths, and other features. Glue everything onto the paper bag and voila! You have a monster puppet. This is a great way for them to explore their creativity and use their imagination to create their own unique monster.
I remember watching my son create a monster with three eyes and purple hair, it was so creative, it was amazing to see his imagination come to life. Once they’re done, they can put on a puppet show and tell stories with their creations. This is a great craft for a rainy day and it encourages creativity and storytelling. It’s also a fun way to get them thinking about different characters and narratives.
Halloween Craft Tips for Little Hands
Halloween Craft Tips for Little Hands
Choosing the Right Crafts
Alright, so you're pumped to get crafting, but let's be real, not all crafts are created equal, especially when little hands are involved. The key here is to keep it simple and age-appropriate. Forget about intricate designs and multi-step projects. We're talking about crafts that are easy to set up, easy to execute, and won't leave you pulling your hair out. Think big shapes, simple steps, and materials that are easy to handle. Remember, this isn't about creating a masterpiece; it's about having fun and letting those little ones explore their creativity. Also, consider the mess factor. Some crafts are just inherently messier than others, and that’s okay, but be prepared. Keep some wipes and a smock handy, because things are going to get a bit sticky and paint might end up in unexpected places. It’s part of the fun, right?
I remember when I tried to do a complicated decoupage project with my niece, who was two at the time. It was a disaster. She ended up eating the glue, and the whole thing was just a mess. That’s when I realized that simple is always better. So, when choosing crafts, think about what your child can manage, not what you want to create. It’s all about them, after all.
Setting Up for Success
Now that you’ve chosen your crafts, it’s time to set up your crafting area. This is crucial for a smooth and enjoyable experience. First, protect your workspace. Cover your table with a plastic tablecloth or some old newspapers. This will save you from a lot of cleanup later. Next, gather all your materials beforehand. Have everything within easy reach so that you’re not scrambling around looking for glue or scissors while your little one is waiting impatiently. This will also help minimize distractions and keep them engaged. Prepare small containers for paint, glue, and any other materials that might be used. This way, you’ll avoid them taking the whole pot of paint, and making a huge mess. Finally, make sure your little crafter is dressed in clothes that you don't mind getting messy. Old t-shirts or smocks are a lifesaver.
I’ve learned from experience that good preparation is the key to success. One time, I forgot to get all the materials ready, and my son ended up getting bored and wandering off. It was a good reminder to plan everything beforehand. Remember, a well-organized crafting area will make the whole process smoother and more fun for everyone.
Tip | Details |
|---|---|
Keep it Simple | Choose crafts with big shapes and easy steps. |
Prepare the Space | Protect your workspace with a plastic cover or old newspapers. |
Gather Materials | Have everything within easy reach before you start. |
Dress for Mess | Use old t-shirts or smocks to protect clothes. |
Making it Fun
Crafting with little ones should be all about having fun and making memories, it's not about achieving perfection. So, relax, let go of your expectations, and enjoy the process. Encourage your child to explore their creativity. Let them choose colors, mix materials, and make their own decisions. If they want to paint the pumpkin blue, go for it! It's all about expressing themselves and enjoying the experience. Don’t be afraid to get involved, too. Show them how to do things, but also let them do it their way. Sing songs, tell stories, and make it a fun and interactive experience. And remember, it’s okay if things get a little messy, that’s part of the fun. The most important thing is to create a positive experience that they’ll remember for years to come.
I’ve found that when I relax and just let my kids lead the way, the crafts are always more fun and more creative. One time, my son decided to use his fingers to paint instead of a brush, and it turned out to be the most creative painting he ever did. So, let loose, have fun, and don’t worry about the mess. It’s all about making memories together.