Table of Contents
Hey there, crafty parents and teachers! Thanksgiving is just around the corner, and what better way to get your little ones excited than with some super fun "thanksgiving crafts for 4 year olds"? I know, I know, sometimes the thought of crafting with preschoolers can feel like a recipe for glitter explosions and glue disasters, but trust me, it doesn't have to be that way! We're talking simple, engaging, and yes, even somewhat mess-free projects that will have your kids giggling with joy. Forget complicated instructions and endless supply lists. In this article, we will explore easy-peasy turkey crafts that even the smallest hands can manage, from paper plate creations to handprint masterpieces. We'll also dive into some adorable pumpkin and fall-themed art, because who doesn't love a bit of autumnal charm? And because memories are precious, we’ll look at some keepsake crafts you’ll treasure for years to come. Finally, we'll end with some simple, yummy treats and fun activities to make this Thanksgiving truly special. Ready to get started? Let's make some memories!
Easy Turkey Crafts for Little Hands
Easy Turkey Crafts for Little Hands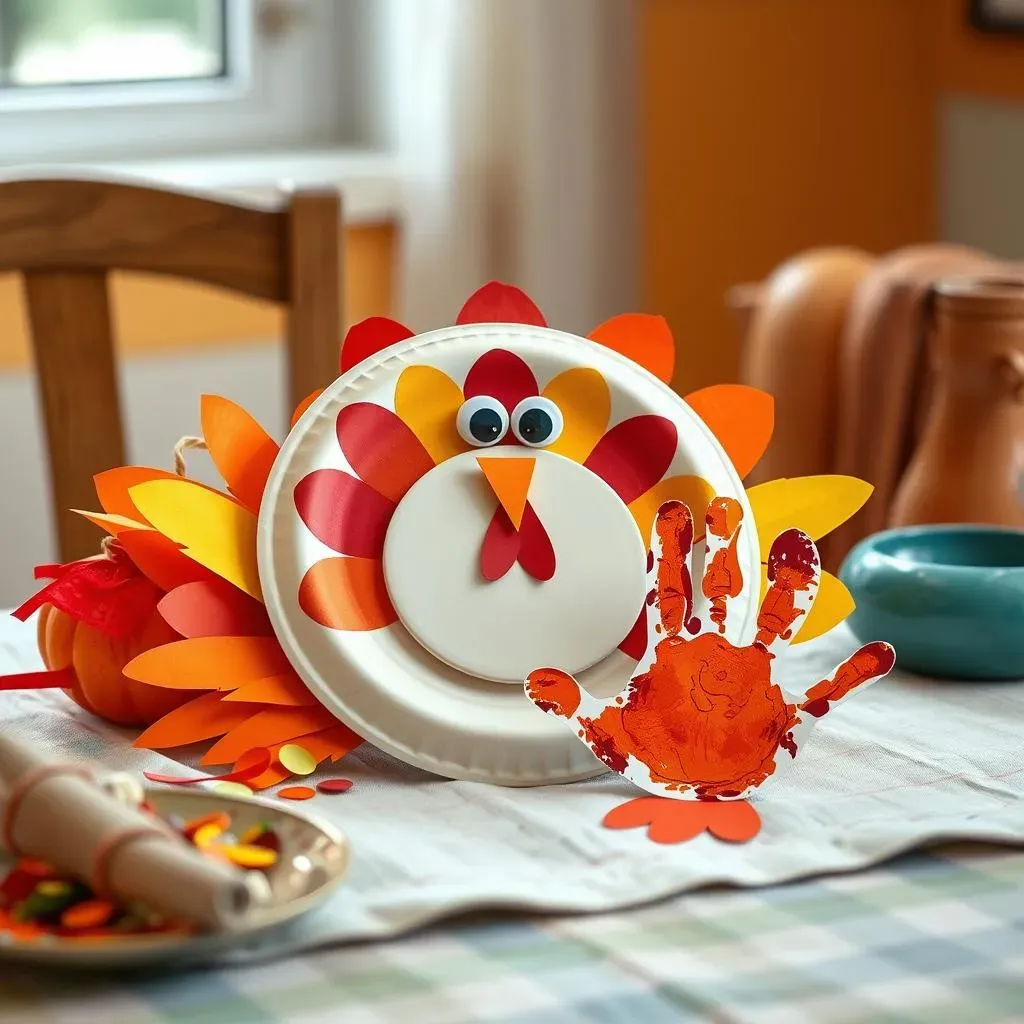
Paper Plate Turkeys
Okay, let's kick things off with a classic: the paper plate turkey. Seriously, it's almost impossible to mess this one up, which is a huge win when you're dealing with four-year-olds. Grab some paper plates – the cheap, flimsy ones work just fine – and let the kids go wild with paint. Brown, orange, yellow, even purple if they're feeling adventurous. Once the paint is dry, cut out some simple feather shapes from construction paper. Red, orange, and yellow are great, but hey, let them use whatever colors their hearts desire. Glue those feathers to the back of the plate, add some googly eyes and a little paper beak, and boom, you've got a turkey!
Now, if you're feeling fancy, you can add some extra details. Use a marker to draw little turkey feet. Or, get out the glitter. I know, I know, glitter is the bane of every parent's existence, but let's be honest, it's also wildly appealing to kids. Just make sure you've got a vacuum cleaner handy. You could even let them use pom-poms for the feathers. The point is, this craft is super adaptable. It’s all about using what you’ve got and letting the kids express themselves.
Supply | Why it's great for little kids |
|---|---|
Paper plates | Easy to handle, sturdy base |
Construction paper | Simple to cut and glue |
Googly eyes | Adds fun, easy to stick on |
Glue sticks | Less messy than liquid glue |
Handprint Turkeys
Next up, we've got the handprint turkey. This one is not only fun to make, but it also creates a sweet keepsake. It’s a great way to see how much those little hands grow over the years. You'll need some paper, and washable paint. Let your four-year-old choose their favorite colors – maybe not the same color for the whole hand, let them get creative. Paint their little hands and then press them firmly onto the paper. Once the handprints are dry, add some eyes, a beak, and maybe some feet. You can even turn the fingerprints into feathers by adding little details with a marker.
"The best crafts are those that capture a moment in time," says my friend Sarah, who's a preschool teacher. "Handprint crafts are perfect for that." And she's right! It's a great way to create a memory. I know some parent's like to make it every year, it's a great way to see the growth of your kids. This craft is simple enough for even the most impatient four-year-old, but the end result is always adorable. Plus, it's a great way to get your kids' hands a little messy, which is always a bonus in my book.
Pumpkin and FallThemed Fun
Pumpkin and FallThemed Fun
Paper Plate Pumpkins
Alright, so we've tackled turkeys, now let's move on to pumpkins! Because what's fall without a little pumpkin action? We're sticking with our trusty friend, the paper plate, for this one, too. This time, paint them orange, or yellow, or whatever colors scream "pumpkin" to your little artist. Once the paint dries, you can get into some fun decorating. Cut out some simple triangle shapes for eyes and a mouth from black paper, or use markers to draw silly faces. Don't forget to add a green stem on top! You could even use real dried-out stems from your garden if you want to get extra earthy, or just use some green paper, whatever works best for you. For added texture, let the kids glue on some small pieces of orange or yellow tissue paper. It gives it a cool, dimensional look that's fun to touch.
You know, I think the beauty of these crafts is that they're so simple, but they really let the kids' creativity shine. There's no right or wrong way to decorate a pumpkin, and that's what makes it so great. Let the kids be the artists here, and just guide them along. I think sometimes we get so caught up in making things "perfect" that we forget to just let the kids have fun, right?
Materials | Why it's fun |
|---|---|
Paper plates | Perfect for little hands to hold |
Orange paint | Classic pumpkin color |
Black paper | Great contrast for faces |
Green paper | Adds the stem detail |
Leaf Rubbings
Okay, so, let’s get a little nature involved! Leaf rubbings are another fantastic and super easy project. It's a great way to get the kids outside for a bit to collect some leaves of different shapes and sizes. Once you have your collection, put a leaf under a piece of paper, grab some crayons and have your kid rub the side of the crayon gently over the paper. The leaf's texture will magically appear! This activity is great because it shows kids how to use nature to create art. Plus, it's a great way to talk about different types of trees and leaves. I’ve seen kids become completely mesmerized by the way the leaf patterns appear on the paper, it's like magic to them.
"Connecting kids with nature through art is so important," says my neighbor, who is a huge nature-lover. "It teaches them to appreciate the world around them." And she's spot on. It’s not just about the art, it’s about getting kids outside, exploring the natural world, and learning something new. You can even extend this activity by having them sort the leaves by shape or color after you're done with the rubbings. It makes it a fun learning experience.
Handprint and Keepsake Thanksgiving Crafts
Handprint and Keepsake Thanksgiving Crafts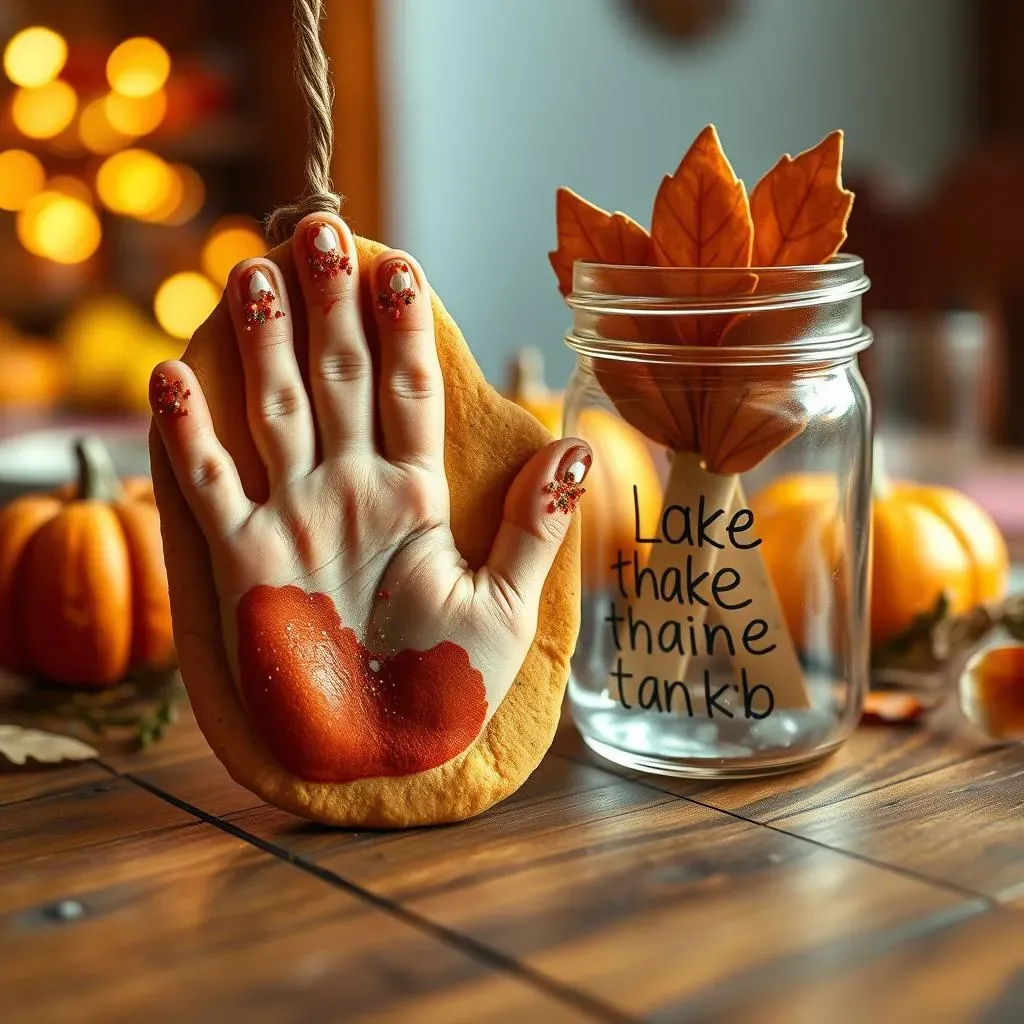
Salt Dough Handprint Keepsakes
Okay, so, you want to make something that’ll last a little longer than a paper plate? Let's talk salt dough! This stuff is like magic, and it’s super simple to make. It's just flour, salt, and water, you’d be surprised how easy it is. Once you've got your dough, roll it out and let your 4-year-old press their hand into it. You can use a cookie cutter to shape it, like a circle or a heart, or just leave it as is. Then, bake it until it's hard, and let it cool. The fun part is when they get to paint and decorate their handprints. They can use paints, markers, and even glue on some little beads for extra sparkle. This is a great one because it’s not just a craft, it's a keepsake. It's something you can look back on in years to come and see just how tiny their hands once were. I know I cherish these little mementos, they're such a beautiful reminder of how fast time flies.
And you know, it’s not just about the end product. It's about the process. It's about getting messy with your kids, laughing together, and creating something special. These are the moments that kids remember. It’s not the fancy toys or the expensive outings, it’s the time spent together making something with their own hands. It's a great way to teach them about creativity and the joy of making things. Plus, it's a pretty cool way to show off those little handprints.
Materials | Why it's great |
|---|---|
Flour, salt, water | Simple, household ingredients |
Cookie cutters | Help create fun shapes |
Paint and markers | Let kids express their creativity |
Beads or glitter | Add extra sparkle and texture |
Thankful Turkey Jar
This next one is a bit different, it's not just a craft; it’s a way to teach your kids about gratitude. It's a "Thankful Turkey Jar." Grab a mason jar or any jar you have lying around, and let the kids decorate the outside. You can use paint, markers, or even glue on some colored paper. Then, cut out some feather shapes from construction paper. On each feather, write something you're thankful for. It could be anything. "I am thankful for my family," "I am thankful for my toys," or even "I am thankful for pizza." It doesn't matter what it is, as long as it's something they appreciate. Have your four-year-old glue the feathers onto the jar so it looks like a turkey. You can add some eyes and a beak to finish the turkey look. Throughout the month of November, add to the jar, it's a way to encourage kids to think about all the good things in their life.
I really love this idea. It’s not just about creating something pretty, it’s about teaching kids to be thankful. It's a great way to get them thinking about what they have, instead of what they want. It’s a simple way to bring a little bit of gratitude into your home and make Thanksgiving a little more meaningful. And honestly, it’s such a sweet thing to look back on when the kids get older, a little reminder of what they were grateful for when they were little. It's a craft with a purpose, and those are the best kinds, in my opinion.
Simple Thanksgiving Treats and Activities
Simple Thanksgiving Treats and Activities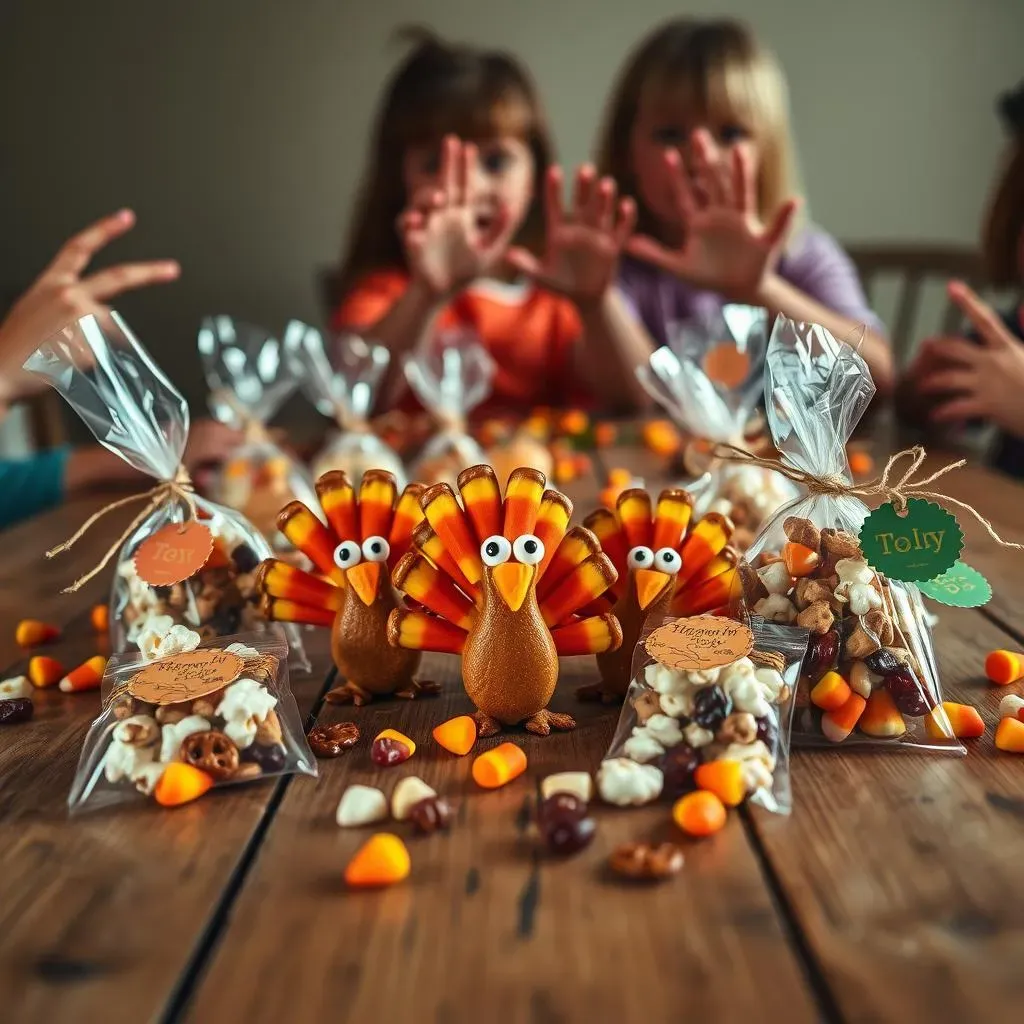
Candy Corn Turkeys
Alright, let’s talk snacks! Because what’s a party without some yummy treats? We're keeping it super simple with these candy corn turkeys. You'll need some candy corn, some pretzel sticks, and some peanut butter or melted chocolate. Now, you're gonna use the peanut butter or melted chocolate as your "glue," just a dab will do. Stick three candy corns on a pretzel stick, with the points facing out like little feathers. Add a small candy eye to the front of the pretzel stick, and you’ve got yourself a mini candy corn turkey! These are so quick and easy, they are perfect for little hands, and honestly, they're so cute it's hard to resist eating them all.
I think the best part about these snacks is how simple they are, and that even your little ones can help assemble them. It’s a great way to get them involved in the kitchen, without too much mess. And, let’s be honest, they’re pretty darn cute. I've done these with my niece and nephew and they loved it, they were so proud of their little candy turkeys! It is a perfect balance of fun and yummy.
Ingredient | Why it's great |
|---|---|
Candy corn | Festive colors, easy to handle |
Pretzel sticks | Provide a sturdy base |
Peanut butter/melted chocolate | Acts as edible "glue" |
Candy eyes | Adds a cute touch |
Thanksgiving Treat Bags
Okay, so, you’ve got the crafts, you’ve got the snacks, now let’s talk about treat bags! These are perfect for sending home with your little ones after a Thanksgiving celebration, or just for a fun surprise. Get some clear cellophane bags, or even some brown paper bags, and let the kids decorate them. They can use stickers, markers, or even glue on some leaves or paper cutouts. Then, fill them with some goodies. I like to add a mix of healthy and fun snacks. Some popcorn, some dried cranberries, maybe some mini pretzels, and of course, a few candy corns. You can even throw in a small toy or a cute little note.
“It’s the little things that make a big difference,” says my friend, who's always got the best ideas for parties. And she’s so right. These little treat bags are just a small gesture, but they can make a big impact. It's a nice way to say thank you for coming, and it's something the kids can take home and enjoy. It’s like a little piece of the Thanksgiving celebration they can carry with them. Plus, it's a great way to get the kids involved in preparing for the party, too.
- Popcorn
- Dried cranberries
- Mini pretzels
- Candy corns
- Small toys or stickers